
Hello nail enthusiasts! Do you find yourself tired of spending a fortune at the salon for a manicure? Well, you’re in luck because we have the ultimate guide to achieving a salon-worthy DIY manicure in the comfort of your own home. This listicle will walk you through 10 simple steps to help you achieve the perfect at-home manicure. Get ready to learn tips and tricks to save money, time, and still rock a fabulous set of nails! Let’s jump right into it!
1) Starting Fresh
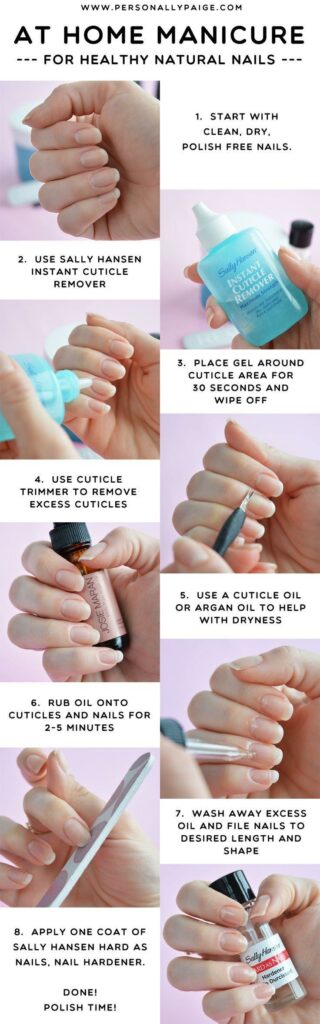
The first step is preparing your nails by removing any existing nail polish with a gentle, acetone-free nail polish remover. This helps keep your nails moisturized and healthy while effectively removing old polish.
2) Soak and Soften
Soak your fingertips in warm, soapy water for about five minutes to soften the cuticles and make them easier to push back. This step also helps remove any dirt or debris around your nails.
3) Cuticle Care
Gently push back your cuticles using a cuticle stick or orange stick—be careful not to cut them as it can lead to irritation and potential infection.
4) Nail Shaping
Master the Art of DIY Manicures with These 10 Easy Steps!
Do you want to have beautiful and well-groomed nails without spending a fortune at the salon? You can achieve professional-looking manicures right at home with these 10 easy steps. Not only will you save time and money, but you’ll also have the satisfaction of mastering the art of DIY manicures.
Step 1: Gather Your Supplies
Before you begin your DIY manicure, make sure you have all the necessary supplies on hand:
- Nail polish remover
- Nail clippers
- Nail file
- Cuticle pusher
- Cuticle oil
- Base coat
- Nail polish of your choice
- Top coat
- Cotton pads or balls
- Hand cream
Step 2: Remove Old Nail Polish
Start by using nail polish remover to completely remove any old nail polish from your nails. This will provide a clean canvas for your new manicure.
Step 3: Shape and Trim Your Nails
Use nail clippers to trim your nails to your desired length, then use a nail file to shape them. Whether you prefer rounded, square, or almond-shaped nails, filing them to your preferred shape is essential.
Step 4: Push Back Your Cuticles
Apply cuticle oil to soften your cuticles, then use a cuticle pusher to gently push them back. This step will make your nails look longer and neater.
Step 5: Apply a Base Coat
Applying a base coat will help your nail polish adhere better and prevent staining. It also adds an extra layer of protection for your nails.
Step 6: Apply Your Favorite Nail Polish
Now comes the fun part – applying your chosen nail polish color. Whether you prefer a classic red, a trendy nude, or a fun pop of color, apply your polish in thin, even coats for the best results.
Step
Once your cuticles are pushed back, use a nail file to shape your nails according to your preference—whether it’s square, round, almond-shaped. The goal is creating smooth and even shapes that complement your hands.
5) Smooth It Out
After shaping out‚ use gently buff buffer surface nails smooth out ridges create flahless canvas DIY manicure.
Apply Base Coat
Before applying nail polish‚ important apply base coat protect nails ensure goes smoothly helps could also opt added benefits such hydration growth properties thin layer will result longer-lasting professional-looking
Future Outlook
So there you have it -10 simple steps achieve perfect DIY manicure home With a little practice patience can save time money still achievingsalon-quality results don’t be afraidto experiment different colors designs remember fun Happy manicuring!